Showing posts with label Radio (RF). Show all posts
WEARIFY

Lamp and Fuse Tester Circuit Diagram

Why a lamp tester or fuse tester? Testing cables, wires, lamps… belongs to a repair job and sometimes this becomes too cumbersome since one has only two hands and too often, one has to hold the part being tester and the two probes of an ordinary continuity tester all at the same time.

This fuse and lamp tester enables easy testing of lamps and fuses by using the conductivity of the human body. One of the test probes is connected to the part under test while the other probe is hel dby the normal hand.

Lamp and Fuse Tester Circuit Diagram 

Circuit Project: Lamp & Fuse Tester

When the lamp or fuse is working properly, your eyes will glow in the dark! Just kidding :) . When the lamp or fuse is working properly, a small amount of current flows through the hand which is enough to switch the transistors and light the LED.
Read More
WEARIFY

Mobile phone Circuits to Get Even smaller

Transceivers, appliances such as mobile phones that can send and receive messages, have become smaller and smaller over the last few years, but users are about to experience a new meaning in miniaturisation.

Research at The Hong Kong University of Science & Technology (HKUST) has successfully combined a unique system architecture and new circuit design techniques to reduce them in size like never before.
Principal Investigator Dr Howard Luong said the handset of a typical mobile phone today may contain between 150 and 300 separate electrical components.

His research group proposed and demonstrated circuit techniques that make it possible to combine many of these components to a single chip and therefore to significantly reduce the size of circuitry (see example in graphic). A US patent has been granted for one of the circuit techniques.

The transformation applies to the CMOS (Complimentary Metal-Oxide Semiconductor) manufacturing process, which can produce integrated circuits and systems with the highest integration level at the lowest cost. Applying new techniques to the CMOS process, Dr Luong’s research enables many “off-chip” components to be combined to realize a system-on-chip. “But,” he said, “this integration created great challenges in circuit implementation.” Part of the research was to solve the problems by new circuit design techniques.

“The system architecture and circuitry go hand in hand, he added. “They must both work, or neither will be useful.”
The resulting design gives the highest component integration in the smallest chip area ever reported, said Dr Luong.
In his design, all off-chip components are fitted into a central chip measuring 36 mm with packaging, and 8mm without being packaged.
Dr Luong’s miniaturisation method means appliances will soon be made for even lower cost and lower power consumption in addition to being much smaller in size and lighter in weight.
“With the lowering of cost, size and power, many new and interesting applications will become possible and practical,” he said.
Low-power wireless transceivers, for example, could be integrated into implanted devices such as heart pacemakers to wirelessly transmit and receive information between patients and doctors or monitoring systems.
Wearable mobile phones as small as wrist watches at an affordable price could also become a reality.
Read More
WEARIFY

Telephone for VoIP gate Circuit Diagram

A project of Telephone for VoIP gate Circuit Diagram. Calls over the Internet can be in several different ways. For households with a permanent connection to the Internet, it is advantageous to use different IP phones and VoIP gateways that need to function on the computer. Because IP phones are still relatively expensive, they are used more often different VoIP gateway. VoIPgateway is "one end" connected to a network with access to the internet, the "other end" connects a standard analog phone, which is then used in the normal way and that has given a telephone number available from any fixed or mobile phone. Some VoIP gateway router in addition to that we need as well, if we want to access via a modem to connect multiple computers. To my VoIP gateway, we can connect nehomologovaný, self made ​​phone. Instructions for simple phone is the subject of this article.

How to the phone works

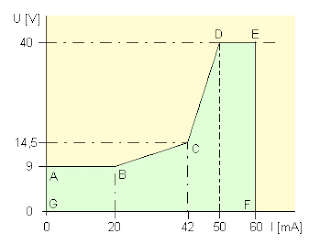
Normally the phone line is a DC voltage, usually 50 to 70 V. During the ringtone to this voltage superposed yet AC 50-100 V with a frequency of usually 20 or 25 Hz. "Pick up the 'phone line will pass through the current 20-40 mA. On the phone while the voltage drop occurs several volts (Fig. 1). This voltage can be used to power the circuitry phone. The polarity of the DC voltage is not defined, the phone must function in both polarities. The phone line is when answering the call of a defined impedance, which should be adapted telephone. Line impedance in different countries vary so as the phone purchased in Germany (impedance 220 ​​ohms + 820 ohms in parallel with 220 nF) not in Bohemia (600 ohms) to work optimally. Sometimes differ impedance different networks within the same country, depending on the age and type of telephone exchanges, length and characteristics of the cables.

Fig. 1 The voltage on the raised phone

Fig. 1 The voltage on the raised phone would, depending on the passing stream should be in the area indicated by the letters A to G

The most important part of the phone is a colloquial circuit. The call is transmitted over the line modulation current that flows through the line. The current is modulated on the side panel (VoIPGateway), which transfers the call to the user, and in the device, which is transmitted from the user. The speech circuit is a hybrid circuit that suppresses the signal from the microphone in the earpiece. The hybrid circuit is on the opposite side (PBX, VoIP gateway). The hybrid circuit is usually some sort of bridge, and therefore it is necessary to impedance phone and VoIP gateway (or exchange) have been adapted. It is important especially for VoIP devices, where the influence of digitization and transmission of data over the Internet arises signal delay in the order of tens of milliseconds. Mismatch, especially on the VoIP gateway, there is a very annoying echo.

Fig 2nd Simple telephone hybrid circuit

Fig. 2 Colloquial hybrid transformer circuit. If L1 and L2 have the same number of threads and balancing impedance ZM is equal to the line impedance ZL, the microphone signal in the handset suppressed


Another important part of the circuit for dialing. All modern devices support tone dialing. Ringing circuit to alert the user to an incoming call. Acoustic (bell) or optical signals indicates the presence of ringing voltage on the line. Hook switch is a switch that turns on the circuit colloquial answer the phone.

Specifications


Telephone impedance:
aprox. 600 Ohm.

Recomended line impedance:
real. 600 Ohm.

Operating (off-hook) current:
20 mA
(10 to 40 mA.)

Operating voltage:
aprox. 7 V @ 20 mA.
 Dialing:DTMF

"In-use" indication:
3 to 15 V/ aprox. 1 mA

On-hook current:
aprox. 0,01 mA @ 50 V


Phone Circuit Schematic

Fig 3rd Telephone unit schematic


Fig 3rd Telephone unit schematic

Connection phone in Figure 3 Colloquial circuit with transistors T1 to T3 is connected via a hook switch and bridge DB1 to the telephone line . Diode bridge ensures that electronic circuits are supplied with the correct polarity. If the hook switch is closed, current passes through the transistor T1 lines , which is used as microphone amplifier and transistors T2 and T3 , which amplifies the signal to the receiver. Headphone amplifier operates in class A. The amplitude of the output voltage at the collector of the transistor is about 1 V, which for the purpose of completely sufficient . Headphones or speakers can be used with an impedance of 8 ohms , the amplifier but works better (has lower distortion) with higher impedance load . Trimmer P2 can adjust the gain as needed.

The amplifier is continuously drop of about 1.3 V, the sum of the voltage UBE transistors T2 and T3 and is only slightly dependent on the flowing current. This voltage across the resistor R1 is powered electret microphone . The signal from the microphone passes through C1 to the base of transistor T1 . It amplifies the signal level required to excite the line. Originally, the microphone amplifier much more difficult . But he had unnecessarily high gain and output impedance inappropriate . This simple connection works better . Working point T1 is set resistors R2 to R4 . The microphone amplifier there is a voltage drop of about 3.5 V , the voltage drop can be under current amplification T1 changed 3 to 4 V. Resistor R5 introduced at this stage, a negative feedback regulating the amplification and decreasing distortion. Balancing circuit C6, R6 and P1 suppresses the signal from the microphone in headphone amplifier .

The signal from the microphone is on the collector of T1 opposite phase than the emitter , but the amplitude of the signal at the collector is much greater. Potentiometer P1 can set a condition where the signals from the collector and emitter of the capacitor C7 T1 readings and audio from the microphone in the handset is suppressed. Simplified diagram balancing the bridge is in Figure 4 The setting is very dependent on the impedance of the line. Because VoIP gateway creates a link with the active resistance of 600 ohm and short supply does not create a significant reactive component , the setting is simple and very effective. The signal coming from the gateway or PBX is the collector and emitter of T1 phase balancing circuit and is therefore not suppressed.

Fig. 4th Simplified wiring hybrid (balancing) circuit in the phone

Fig. 4th Simplified wiring hybrid (balancing) circuit in the phone

In order to suppress its signal worked well on the VoIP gateway, you need the phone to be defined impedance close to the impedance of the gate, ie 600 ohm. The output impedance of the collector T1 for AC signals, large, almost current source. Impedance of the phone for voice signals are essentially a parallel combination of R6, R1 and about one order larger impedance collector T1. Rectifier bridge through which the signal passes, it will affect the impedance to a minimum.

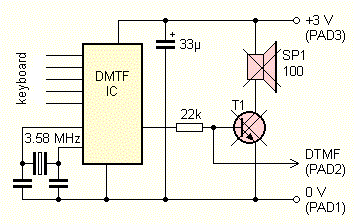
 Fig 5 Dialer circuit arrangement
 Fig 5 Dialer circuit arrangement

For DTMF I did not find any suitable integrated circuit , and generate DTMF signal discrete oscillators would be difficult and impractical . Finally, I modified the DTMF phone dialer . Dialer is a small box with buttons and speaker , generating tones when you press the button corresponding to the relevant figures. It is used for remote telephone answering and for the selective choice of the civil radio stations . The dialer (Fig. 5 ), the signal goes from the integrated circuit via the 22k resistor on the transistor, which drives a small speaker . Transistor speaker and I vymontoval a DTMF signal is connected to the transistor T4 on the phone. After pressing the button, the IO output voltage appears about 1 V with superimposed DTMF signal . Connect the telephone line is very simple, just enough transistor T4 and resistor R7. The change in resistance R7 can adjust the intensity of tone . Speaker of the phone dialer I used it as a handset . Dialer , according to the type of memory to 11 or 13 numbers , but unfortunately it lacks useful the " Redial" to repeat the last number called. I could not deal with power dialer from the phone line , so your phone is a small battery , which is likely to last for many years. The battery has an advantage in that it forgets the stored phone numbers if you disconnect it from the line.

Also, the ringing circuit I did not get special IO . That's why I like bell oscillator is used samovybuzujícím a piezoelectric transducer . The oscillator is fed stream that passes through the ringer capacitor C8 , bridges DB2 , LED2 to LED4 and resistor R14 . The oscillator is operated only in one half , the sound is more significant . In the other half cycle current through diode D1 . The bell must have a dead zone . That there is provided connecting the LED. Ringing voltage amplitude must have at least 10 V to Buzzer began publishing a sound. The phone I used a blue LED with high luminance. These intensely lit even at current several milliamps , which is ringing flow. LED also serves as a visual alarm bell , which could be useful in noisy environments .

The last telephone circuits are busy lamp . Phone I was seeking a second phone in parallel connected to the device at the other end of the apartment . When the phone is " suspended " , the hook switch is switched to the circuit with transistors T5 and T7 . If all telephones on the line hung on the line voltage of 50 to 60 V. The transistor T5 is opened, closed, and T7 LED1 off. The circuit is taken from the line is very little current through resistors R8 and R9 . Shrinks if the line voltage is below 15 V, T5 is closed , opens T7 and LED1 lights up. Transistor T6 T7 gate bias control by the loss of the R11 so that LED1 is energized about 1 mA , which is quite sufficient for display . In the voltage range of 3-15 V line lights LED1 virtually the same. BSS123 transistor has a maximum voltage UDS only 100 V. If the ringtone is this voltage is exceeded. In my phone's built higher voltage transistor has lasted several months . If you're worried about him , you can type BS108 with UDSmax 200 V, but it is not in SMD . The "in use" circuit not be planted, if you indicate you do not need , or can be used alone for another phone .

Mechanical Design

Width of the printed circuit board was designed dimensions dialer , then the length of a "reasonable " distance between the microphone and earpiece. Although the board is a lot of space , most of SMD components . They take up less space and is easier mounting plate is not so much tinkering . Figure motive circuit and layout of components , following table .


Mechanical Design

Before you assemble components, prepare the first dialer and attach it to desce.Z dialer remove the battery and remove the hinged cover. Dialer carefully "crack". It should go fairly easily if you start in the corner, to which is attached a chain. Odpájíme the speaker wires from the board dialer and speaker carefully shucks from the bottom of the box. The board dialer vypájíme more transistor in TO92. The board dialer solder short wires to negative (Pad1) and positive (PAD3) terminal electrolytic capacitor and terminal for transistor-based vypájeného (PAD2). Editing is perhaps evident from Figure 9 photos The lower part of the housing dialer yet only tentatively secured to the plate phone plastic rivets (Fig. 10). We remove the box and the board will be filled by phone components.

 Fig. 6th Editing dialer and connection terminals
 Fig. 6th Editing dialer and connection terminals


Phone was originally in a transparent plastic box, which was inside the LED backlight. Its production, however, I not successful, so I made ​​a wooden box. To her I used plywood manufacture of soft wood, obtained from the fruit of hazel. That will free devoted almost everyone greengrocer. From one high hazels get material for a few boxes. Plywood is easily machined and well bonded dispersion adhesive. I eventually recut the box, namoÅ™il and pÅ™elakoval polyurethane varnish.

 Fig. 7th Mounting boxes dialer
 Fig. 7th Mounting boxes dialer

With the change in boxes I had to adjust some components on the board. LEDs were originally all SMD. Finally, there were only SMD LED 2. But it is not visible from the outside, and therefore does not need much light. You can replace the zener diode (3-12 V) or short-circuit, but it increases the sensitivity of the ringing circuit. Other LED in case of 3 mm diameter. It turns out that it is better to use LED with high luminous than type 2 mA of current, because the small stream shines more. Also switch SW1 on the phone "lifting", I moved to the side boards. Deferred phone is on the table laid down the keyboard. LED on the back because they are easy to see and switch is when you pick up the phone available with one touch. Of the joints it can not be soldered to the board just because they do not get tipped soldering iron to solder pad. On the solder contacts because I rozklepl small rivets, which I soldered joints by.

I then links to the rivets inserted the switch and soldered it from the opposite side of the board. Between the switch and the plate I put a piece of insulating paper. The switch can also be placed at any other suitable location in the box and board interconnect wires. Switches P-B143 of the newer series ("silver") are not too good and We turn the lever sometimes lose contact. To fix it so that "packs" pertinax holding plate with pins a little more same hopper. The defect had all the pieces that I had at home. Dimensionally the same switch, but painted black were fine.

Fig. 8th The top side of the printed circuit board
 Fig. 8th The top side of the printed circuit board


The power dialer instead of the original articles I used lithium batteries. Do you solder boards phone as housing purchased as the GM and housing that vypájíte of defective motherboards PC that has otherwise placed pins. Piezoelectric transducer is bolted small screws through the PCB to the bottom of the box dialer.
On the microphone I slid the piece of tubing so that the tubing fit snugly inside the box. Thus reducing the acoustic coupling between the earpiece and microphone inside the device.

Fig. 9th The underside of the plate and box
 Fig. 9th The underside of the plate and box


Fig. 10th The back of the phone with LED switch and a hole for the bell

Fig. 10th The back of the phone with LED switch and a hole for the bell

Animation

Phone use in conjunction with the gateway Linksys Sipura SP2100. In the firewall settings to make sure that in menu / admin / voice / advanced tab you have set up Regional impedance lines FXS Port Impedance: 600 Phone can revive a product as shown in Figure 14 (SW1 closed). You can test with a different phone when line current, measure the voltage on the line and estimate the impedance of the phone - AC voltage test point should be after the switch opens twice. The trimmer P2 dial to maximum resistance (max volume). To attach the microphone sound source (eg mp3 player headphones) and adjust the trimmer P1 so that the sound from the microphone not hear the telephone handset. Try tone. Ringing circuit you can try connecting the phone via a suspended resistor 1 kOhm to AC voltage 24-50 V.

 Fig. 11th test preparation
 Fig. 11th test preparation

Conclusion

The phone is in operation for several months and yet it was conceived as a second auxiliary telephone is often used. I have tested it successfully on the public switched telephone network (PSTN), but because I'm not sure whether it meets all required standards, there should not be connected. PSTN to VoIP gateway over a larger voltage when hanging up a more current when the phone is picked up.

List of components
 
R14,7 kOhm, SMD 1206
R21 kOhm, SMD 1206
R3, R422 kOhm, SMD 1206
R533 Ohm, SMD 1206
R62,2 kOhm, SMD 1206
R7220 Ohm, SMD 1206
R8, R910 MOhm, SMD 1206
R10330 kOhm, SMD 1206
R11470 Ohm, SMD 1206
R12220 kOhm, SMD 1206
R13, R1410 kOhm, SMD 1206
P1250 Ohm, trimr PT6V (Piher)
P25 kOhm, trimr PT6V (Piher)
C1220 nF, SMD 1206
C210 mikroF/16 V, tantalum., SMD B
C31000 mikroF/6,3 V, electrolytic
C4, C5100 mikroF/6,3 V, tantalum, SMD D
C647 mikroF/16 V, tantalum., SMD D
C74,7 mikroF/10 V, tantalum, SMD A
C8220 nF/250 V, foil MKT RM5
PCB board bcs59

D11N4148SMD, SOD80
DB1, DB2S250,mini DIP bridge
ZD1BZV55C15SMD, Zener. diode 15 V SOD80
T1, T3BC817-40, SOT-23
T2BC807-40, SOT-23
T4 až T6, T8BC848C, SOT-23
T7BSS123, SOT-23 (BS108, TO92)
LED1high intensity 3 mm red LED (it's better than 2 mA LED)
LED2any 3 mm SMD LED or Zener diode 3 to 12 V
LED3, LED4high intensity 3 mm blue LED (it's better than 2 mA LED)
MIC1elektret. mikrofon MCE100
SP1tiny speaker or headphone 100 Ohm (8 to 100 Ohm),
removed from dialer
B1CR2032 battery and holder
SW1 P-B143, SPST switch
K1slim RJ11 plug WEBP 6-4 LP
SP2piezo KPT2038FW
dialerdialer DTMF 13 or 11
Read More
WEARIFY

Water Level Controller Detector

Water Level Controller Detector. In most houses, water is first stored in an underground tank (UGT) and from there it is pumped up to the overhead tank (OHT) located on the roof. People generally switch on the pump when their taps go dry and switch off the pump when the overhead tank starts overflowing. This results in the unnecessary wastage and sometimes non-availability of water in the case of emergency.  The simple circuit presented here makes this system automatic, i.e. it switches on the pump when the water level in the overhead tank goes low and switches it off as soon as the water level reaches a pre-determined level. It also prevents ‘dry run’ of the pump in case the level in the underground tank goes below the suction level. 

Water Level Controller Detector

 
In the figure, the common probes connecting the underground tank and the overhead tank to +9V supply are marked ‘C’. The other probe in underground tank, which is slightly above the ‘dry run’ level, is marked ‘S’. The low-level and high-level probes in the overhead tank are marked ‘L’ and ‘H’, respectively.  When there is enough water in the underground tank, probes C and S are connected through water.As a result,transistor T1 gets forward biased and starts conducting. This, in turn, switches transistor T2 on. 

Initially, when the overhead tank is empty, transistors T3 and T5 are in cut-off state and hence pnp transistors T4 and T6 get forward biased via resistors R5 and R6, respectively.  As all series-connected transistors T2, T4, and T6 are forward biased, they conduct to energise relay RL1 (which is also connected in series with transistors T2, T4, and T6). Thus the supply to the pump motor gets completed via the lower set of relay contacts (assuming that switch S2 is on) and the pump starts filling the overhead tank. 
Controller Detector
Once the relay has energised, transistor T6 is bypassed via the upper set of contacts of the relay. As soon as the water level touches probe L in the overhead tank, transistor T5 gets forward biased and starts conducting. This, in turn, reverse biases transistor T6, which then cuts off. But since transistor T6 is bypassed through the relay contacts, the pump continues to run. The level of water continues to rise.  When the water level touches probe H, transistor T3 gets forward biased and starts conducting. This causes reverse biasing of transistor T4 and it gets cut off. As a result, the relay de-energises and the pump stops. Transistors T4 and T6 will be turned on again only when the water level drops below the position of L probe. 

Presets VR1, VR2, and VR3 are to be adjusted in such a way that transistors T1, T3, and T5 are turned on when the water level touches probe pairs C-S, C-H, and C-L, respectively. Resistor R4 ensures that transistor T2 is ‘off’ in the absence of any base voltage. Similarly, resistors R5 and R6 ensure that transistors T4 and T6 are ‘on’ in the absence of any base voltage. Switches S1 and S2 can be used to switch on and switch off, respectively, the pump manually.  You can make and install probes on your own as per the requirement and facilities available. However, we are describing here how the probes were made for this prototype. 

The author used a piece of non-metallic conduit pipe (generally used for domestic wiring) slightly longer than the depth of the overhead tank. The common wire C goes up to the end of the pipe through the conduit. The wire for probes L and H goes along with the conduit from the outside and enters the conduit through two small holes bored into it as shown in Fig. 2. Care has to be taken to ensure that probes H and L do not touch wire C directly. Insulation of wires is to be removed from the points shown. The same arrangement can be followed for the underground tank also. To avoid any false triggering due to interference, a shielded wire may be used.
Read More
WEARIFY

A Simple - Yet Useful Video Switcher

With the cost of security cameras going down, adding a surveillance system for your store, office or home is becoming more practical all the time. However, you might be dismayed at the thought of having to buy a monitor for every camera that’s installed. dedicating a single monitor to a single camera also runs the risk of burning the camera’s image into the phosphor screen of the CRT. If you prefer a single monitor instead of the “NASA-Mission Control” look, you could buy a special monitor that has a video switcher built in. That type of monitor can automatically switch between several camera inputs in sequence.

Yet Useful Video Switcher Circuit Diagram:

A Simple - Yet Useful Video Switcher

With that type of arrangement, you’d have to watch only one screen instead of having to scan a wall of CRTs. Switching between several cameras would also prevent image burn-in on the monitor. Those types of monitors, unfortunately, are also very expensive, offsetting the cost savings of even the cheapest surveillance camera. Video switchers are also available, but the cost of a switcher and a monitor could be as expensive as a monitor/switcher combination unit. A viable alternative for a video switcher is to build your own. Thanks to some recently introduced ICs, the cost and effort of designing and building such a unit has become both quite affordable and easy.


The video switcher described here can display the output of two, three, or four cameras on a single monitor. The number of cameras is set by a DIP switch on the circuit board. That feature avoids blank displays if less than four cameras are used by sequencing through only the inputs that are connected to a camera. In the automatic mode, the cameras are switched at a rate that can be varied with a panel mounted control. The switching rate can be set from about once per second to about once every 20 seconds. In the manual mode, one camera output is displayed continuously. A momentary-toggle switch is then used to step through the various cameras.

How it works

The heart of the video switcher is a Maxim MAX454. That integrated circuit contains a four-way video multiplexer and an amplifier that operates as a low-impedance line driver. The resulting video output is high quality with very low phase distortion. The video inputs are selected by applying a binary number to the address inputs. The binary number is also used to light a series of LEDs that indicate whichh camera input is currently selected. The circuit is powered by a 9-volt AC wall-adapter transformer, two diodes, and two voltage regulators.

Circuit description

Figure 1 is a schematic diagram of the video switcher. Multiplexer IC1 has four video inputs, two address inputs, one video output, one external amplifier input, and and three power terminals. The video cameras connect to the video inputs through J1-J4. The inputs are terminated with 75 ohm resistors R1-R4. The gain of the internal video amplifier is set by a feedback network connected to pin 13 of IC1. That feedback network consists of R5-R8 and C3. The gain is set to 2 in order to compensate for any loss through the 75 ohm terminator resistor, R9. The resulting net gain is 1 at output J5.

The binary addressing circuit is built around IC2, a CD4017 decade counter. That chip produces one positive output at a time on each of its ten outputs in sequence for every clock pulse. The first four outputs at pins 3,2,4,and 7 are connected to transistors Q1- Q4. Those transistors drive LED1-LED4 through current limiting resistor R15. The outputs from IC2 (pins 2,4, and 7) are also decoded into binary logic by diodes D1-D4. The binary logic is sent to the address input lines of IC1.


The number of cameras connected to the video switcher is set with S1. Each switch in S1 is connected to an output from IC2. If, for example, there are only two cameras connected to the video switcher, S1-a is closed. That connects the third output to IC2’s reset line. When IC2 advances to the third count, that output passes through S1-a to the reset, and IC2 resets to zero, activating the first camera. The sequence would be camera 1, camera 2, then back to camera 1. Closing S1-b or S1-c instead of S1-a will let the video switcher cycle through three or four cameras, respectively.

Clock pulses for the counter are generated by IC3, an LMC555 CMOS timer. The pulse rate and pulse width is controlled by C4, R10, R11 and potentiometer R12. By adjusting R12, the output frequency of IC3 can be controlled between 1 Hz and 1/20 Hz. The clock pulses from IC3 are connected to IC2 through S2, a three position toggle switch. Switching S2 to the auto position lets the pulses from IC3 select the next camera at a rate set by R12. When S2 is in its center-off position, no switching takes place, and whatever camera input is selected is passed through to the output.


The select position on S2 is a momentary contact. That position raises the clock input of IC2 to 5 volts, which increments the binary count and selects the next camera. When S2 is released, it springs back to its center-off position. The clock input of IC2 is then held at a low-logic level by R13. The MAX454 requires ±5 volts while the other ICs require only +5 volts. Power is supplied by AC adapter T1, rectifier diodes D5 and D6, regulators IC4 and IC5, and filter capacitors C6-C9.

Construction

Because of the high frequency video signals involved, the video switcher should be built on a printed circuit board. The circuit is simple enough to fit onto a single-sided board with only two jumpers needed. A foil pattern is included for etching and drilling your own board. Alternatively, an etched board can be purchased from the source given in the parts list. A feature of that board design is ground traces that run between all of the video signal traces in order to keep induced noise and crosstalk between the signals to a minimum.

Weather you etch a board from the foil pattern or purchase one from the source in the parts list, use the parts-placement diagram in fig. 2 for component placement. It is easiest to install and solder the resistors and diodes first. Once those components are in place, scrap component leads can be used for the two jumper wires. Next, install S1 and sockets for IC2 and IC3. Do not use a socket for IC1, the MAX454 multiplexer.

When installing J1-J5, hold the connectors tight against the board while soldering the center pin. The assembly can then be placed on a heat-resistant surface and the ground pins soldered. Because of their size and mass, a larger soldering iron might be needed to solder J1-J5. Otherwise the board might be damaged if heat is applied too long. Once the connectors are soldered in place, Q1-Q4, IC4, IC5, and all the capacitors can be installed. The LEDs should be installed next, leaving their leads long so that they can be bent to reach through the front panel of the enclosure.

Double-check the orientation of the polarized components, so that they are not installed backwards by accident. Once a component is soldered in place, removing it becomes much more difficult. Solder two 3-inch long wires onto the two terminals of R12 that are clockwise when viewing the potentiometer from the back. Connect those wires to the holes for R12 on the board. Three additional 3-inch long wires are soldered onto the terminals of S2. The center terminal connects to the hole near C5 and R13.

The momentary-contact terminal connects to the hole near R14. The remaining terminal connects to the hole near IC3 and R10. Solder IC1 directly onto the circuit board. That will result in the shortest possible lead length for the video signals. Plug IC2 and IC3 into their sockets, being careful to handle them as static-sensitive CMOS devices. Solder the T1 leads onto the board. Examine the board for any wiring errors, bad solder joints, and incorrect components. Once the assembly is inspected, it can be tested.

Testing

Plug T1 into an AC outlet and measure the voltages across C8 nd C9. The voltage across C8 should measure +5 volts. Across C9, the voltage should be -5 volts. To select two cameras, set S1-a on; to select three cameras, set set S1-b on; and to select all four cameras, set S1-c on. Only one switch at a time should be on. When switch S2 is toggled to its momentary position, the LEDs should sequence to the next indicator each time S2 is toggled. The order of the LEDs should cycle from 1 through 4 and repeat. When S2 is set to automatic, the LEDs should automatically at a rate that should vary as potentiometer R12 is adjusted. Connect cameras to J1-J4 and a monitor to J5.

The video signal on the monitor should switch from camera to camera according to the LEDs. After testing is completed, drill appropriate holes in a suitable enclosure for J1-J5, LED1-LED4, S2, and R12. Mount the board in the enclosure using the mounting hardware for J1-J5 to hold it in place. Mount R12 and S2 in the front panel and bend the LEDs so they fit through the holes in the panel. The hole for the T1 wire should be drilled at a point where the two halves of the enclosure meet.

Tie a knot in the wire for strain relief and place the wire in the enclosure hole with the knot on the inside of the enclosure before closing the case. That completes the project. If all has gone well, as is likely, your video switcher is now ready for use.

SEMICONDUCTORS
IC1 - MAX454 multiplexer, integrated circuit (MAXIM)
IC2 - CD4017 decade counter, integrated circuit
IC3 - LMC555 timer, integrated circuit
IC4 - 78l05 voltage regulator, integrated circuit
IC5 - 79l05 voltage regulator, integrated circuit
Q1-Q4 - MPSA14, NPN transistor
D1-D4 - 1N914, silicon diode
D5, D6 - 1N4004, silicon diode
LED1-LED4 - Light emitting diode, red

RESISTORS
R1-R4, R9-R15 - 75 ohm
R5 - 150,000 ohm
R6 - 620 ohm
R7 - 1100 ohm
R8 - 1000 ohm
R10 - 10,000 ohm
R11 - 51,000 ohm
R12 - I megohm potentiometer, panel mount
R13, R14 - 100,000 ohm

CAPACITORS
C1,C2,C5 - 0.1mF, 50WVDC, metalized film
C3 - 6.8 pF, ceramic disc
C4 - 10 mF, 50 WVDC, low leakage electrolytic
C5, C7 - 470 mF, 25 WVDC, electrolytic
C8, C9 - 100 mF, 16 WVDC, electrolytic

ADDITIONAL PARTS AND MATERIALS
S1 - DIP switch, 3 position
S2 - Toggle switch, single pole double throw, one momentary position
J1-J5 - Video connector, chassis mount, “F” type
T1 - 9 volt AC wall adapter transformer, PC board, IC sockets, LED holders, 22 gauge hookup wire, knob, enclosure, hardware, etc.
Read More
WEARIFY

Use A DAC To Bias Your Varactor Diode

Varactor (or “varicap”) diodes are used primarily in radio-frequency (RF) circuits to provide a capacitance that can be varied by changing the applied voltage. These types of diodes often are used for tuning circuits, such as RF oscillators and filters found in wireless applications like wireless microphones and radios. Designers, then, should know about the benefits of using a nonvolatile digital-to-analog converter (DAC) to provide the biasing voltage of a varactor diode used as a voltage-controlled capacitor.

The varactor diode is operated under reverse bias, which creates a depletion zone around the P-N junction. Changing the level of the reverse bias changes the thickness of the depletion region and, thus, the effective capacitance of the diode. Increasing voltage causes a decrease in capacitance.

Varactor diodes are specified with a nominal capacitance value and the range of capacitance that can be achieved with a maximum and minimum voltage level. Increasing the bias voltage range increases the capacitance range available, but designers can also look for varactors with a larger capacitance- to-voltage ratio.

A convenient solution for creating a varying bias voltage is to use a DAC. Most DACs have an output voltage range of 0 V to +5.5 V. If a higher voltage bias is required, though, then a high-voltage DAC can be used. However, it may be more cost-effective to use a low-cost, high-voltage operational amplifier in a non-inverting configuration to provide level shifting of the output voltage from a common 5.5-V DAC.

Use A DAC To Bias Your Varactor Diode


              The LC-tank circuit portion of a voltage-controlled oscillator allows for FM modulation in wireless microphones and radios. Its back-to-back varactor configuration minimizes the effects of RF modulation.

Using a DAC does introduce sources of potential error. The varactor is affected by any form of amplitude variation of the bias voltage, resulting in an undesired shift in capacitance. Deterministic errors can be accounted for when using the microcontroller to program the DAC output voltage. The primary sources of error that should be considered include varactor nonlinearity, offset errors, and DAC integral nonlinearity (INL). RF modulation may also be caused by voltage induced from a noise source – perhaps from an antenna in the system. The figure shows an LC-tank circuit portion of a voltage-controlled oscillator. This circuit allows for FM modulation in the aforementioned wireless microphone or radio.

Here, a back-to-back varactor configuration minimizes the effects of RF modulation. If a varying signal is injected, the bias across one diode increases as the other decreases, keeping overall capacitance unchanged. Note that the two diodes are in series with each other, so capacitance is half of a single varactor setup.

To also prevent RF signals from affecting the circuitry outside the tuning circuit, the bias voltage is fed through an isolation resistor or an RF choke. There are other benefits to using a DAC to bias a varactor diode. For example, multiple-output-channel DAC devices can be used in a multistage application. Additionally, in a four-channel DAC, three channels could potentially be used for separate band-pass filters for low-, mid-, and high-frequency filtering. The fourth output could be used for offset voltage calibration elsewhere in the circuit, or it could be turned off when it isn’t in use. Space and design time can be saved by avoiding having to set up separate biasing schemes.

Some DACs, such as the MCP4728, also offer on-board nonvolatile memory, which can store configuration data such as output-voltage levels and channel status (on/off). This enables the device to be reset or powered up into a known set state, which could allow a pre-programmed tune to be stored. The tune could be recalled when a desired event or input occurs or when power is lost and restored.
Sourced By : W3 Circuits
Read More
WEARIFY

How to Build a 18w FM Transmitter

Build a 18w FM Transmitter. Here's a transmitter for commercial FM band provides up to 18 watts of power. Entering an audio signal 1 Vpp standard , which may come from a mixer or stereo coding stage , this system can cover an entire medium of low houses people or an entire neighborhood in a city. If required you can build more power and interconnect output stages to increase the coverage area of the station. 

Since the electronic diagram is too wide for placement on screen we decided segregated into two , in order to be seen without the need to move from side to side of the screen. The point where we cut only two drivers ( represented by A and B ) which are marked with arrows.


 See the Complete Circuit Diagram
 
The Coils and Shocks Should Be Made According to the Following Table:

L1 ------- 3 Turns on ferrite of 5x10mm
L2 ------- 3 Turns on air 9mm ( 10mm long )
L3 ------- 1 Return on 12mm air
L4 ------- 4 turns on air 9mm ( 12mm long )
L5 ------- 2.5 laps on ferrite of 5x10mm
L6 ------- 1 Return on 12mm air
L7 ------- 2.5 laps on HF type ferrite 10x5mm
L8 ------- 3 Turns on air L8 9mm ( 8mm long )
L9 ------- 1 Return on 12mm air
L10 ------- 2.5 laps on ferrite of 5x10mm
L11 ------- 2.5 laps on ferrite of 5x10mm
L12 ------- 7 laps on air 9mm ( 19mm long )
L13 ------- 3 Turns on air L13 13mm ( 7mm long )

The variable capacitor connected to the collector of transistor BF199 to adjust the transmission frequency of the circuit. 2K2 potentiometer (which is linear ) serves fine tuning. Once the output frequency should be adjusted following variable capacitors to calibrate the remaining stages of the transmitter. Remember that these settings are made from the capacitor on the left to the one on the right. Remember that the initial settings should accomplish with phantom loads and not the ultimate antenna to avoid interference to other stations.

With respect to the feeding circuit 14V and 2.5A provides 15W , whereas 18V and 3.5A provides 18W, in all cases the source must be stabilized.

The circuit must be built on an epoxy printed with the upper face (components ) reserved for interconnecting tracks and the bottom (solder ) to the ground plane. We have no printed circuit design . If someone builds this transmitter would appreciate email send us the design of the board.

Transistors 2N3924 , 2N4427 and BLY88 must be mounted heatsinks . In this type of components used sinks star-shaped circular . In the case of transistors 2Nxxxx the ideal size is 20mm in diameter and 10mm in height, while for the BLY88 must be 75mm diameter by 100mm tall. It is mandatory to use silicone grease to optimize the transfer of temperature of the transistors to their sinks . Remember that excessive heat (a part of the output instability ) can cause damage to components.
Read More
WEARIFY

How to Build a Fox Hunt Transmitter

It is a very Simple Build a Fox Hunt Transmitter. This 2 meter 144 MHz fox hunt transmitter is used in amateur competitions where a hidden transmitter is to be “hunted” using mostly home brewed receivers and antennas. The foxhunt electronic circuit is the transmitter. It radiates a high quality signal without unwanted harmonics. Transistor T1 and the crystal together make the oscillator that generates a 36MHz signal.

The unwanted 12MHz basic frequency of the oscillator is suppressed by the filter circuit made of L1, C3, C2. The L2/C4 circuit is set to the fourth harmonic or 144 MHz. The signal goes to the dual-gate-FET driver stage before finally radiating through the transmitting antenna. The output power is from 10…40mW. The radiated signal is also modulated by the gate circuit made of U1, U2, U3, U4. Gate U1 is a low frequency oscillator which generates a signal from 0.1 to 0.5Hz. This signal modulates the transmitter through the transistor T3.

Fox Hunt Transmitter Circuit Diagram

How to Build a Fox Hunt Transmitter

If the U1 output is “0″, transistor T3 is off and the transmitter is also off. On the other hand, if the U1 output is “1″, transistor T3 is on and the transmitter is on. During the “1″ period, gate U2 generates a square wave signal with a frequency form 0.1 to 1Hz. Gate U3 works as an inverter only. It determines whether gate U4 generates a 1KHz signal or not. A periodic burst signal is now present at the gate FET T2 to modulate the transmitter used at foxhunt.

Calibration of the foxhunt transmitter: Adjust the three trimmer capacitors to produse a maximum signal amplitude at the output.

Coil Data:
L1 = 470 nH
L2 is made of 5 windings of 0.8mm copper wire, 8 mm winding diameter. It is tapped at the first winding from the ground.

L3 is made of 0.8mm copper wire, 8mm winding diameter, 3 windings at the FET side and 2 windings at the antenna side. Adjust the coupling between the two windings sides to get a maximum signal output amplitude.
The circuit can be powered with a 9 volt battery. It consumes around 20mA only.

Fox Hunt Transmitter Active Components.

T1 = 2SA256
T2 = 3N205
U1, U2, U3, U4 = IC1 = 4093


Read More
WEARIFY

Simple 3 Volts FM Transmitter Schematic

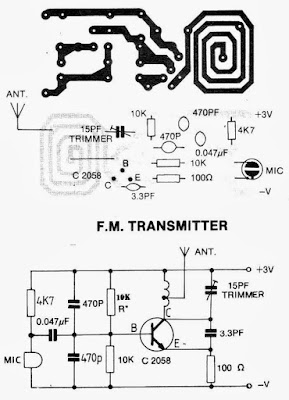
This is a simple and useful circuit diagram of an FM transmitter is sown in this schematic . This FM Transmitter software is very simple and it has a acceptable transmission . The signal transited from this FM transmitter can be received at almost 300 meters in open air The circuit require a 3volts operating voltage and can be tuned anywhere in the FM band.

3V FM Transmitter Circuit Diagram

Simple 3 Volts FM Transmitter Schematic

You can use this emitter circuit to transmit signal from your house to garden or from room to room . To listen the signal you can use any radio (portable or not ) that can work on FM band .

Connect a half or quarter wavelength antenna (length of wire) to the aerial point. At an FM frequency of 100 MHz these lengths are 150 cm and 75 cm respectively.

The calibration of this FM emitter circuit is very simple and you need just to place a radio at some distance from the transmitter and set it somewhere about 88-107MHZ( chose the transmission frequency ) and after that vary the transmitter oscillator frequency , by modifying the value of the capacitor . The transmission frequency is set to the desired frequency just when you can hear the transmitted signal.
Read More
WEARIFY

Low-Cost 9V FM Transmitter

A very simple and useful circuit that require few external components and operates in FM band ( above 100 MHz ). This circuit diagram transmitter needs to be powered from a 9 volts battery or from another 9 volts regulated power supply . The tuned coil L1, has two output tappings for the antenna connection, marked "A" and "B". These are both low-level outputs and you choose which tapping you want to use ( stable low range, or more unstable but higher range).

Low-Cost 9V FM Transmitter

Tap B (2.5%) takes just a very small portion of signal from the oscillator circuit and therefore gives a very frequency stable transmitter. The output level (around 2.5mW) and range are therefore somewhat reduced.  Tap A (10%) delivers very much more power (around 10mW) to the antenna load. This gives you a greater range, but at the expense of frequency stability.

All component leads should be kept as short as possible. The LINK wire on the PCB should lay flat on the PCB. Use the cutoff from a resistor leg. Antenna length for circuit diagram transmitter varies with frequency for optimum distance: 90MHz 80 cm, 95MHz 75cm, 100MHz 70 cm, 105 MHz 68 cm. The frequency determining elements (L1, C5 and C6) form a simple LC tuned oscillator. The inherent problem with this type of circuit diagram transmitter is that any external load (antenna) will change the operating frequency.

The inductor L1 must have around 5.5 turns of enameled 0.5 mm Cu wire , and must have a diameter ( coil diameter) around 5 mm.
Read More
WEARIFY

Low-Cost 3 volts FM Transmitter

This very Simple Electronic Project and useful circuit diagram of an FM transmitter is sown in this schematic. This fm transmitter circuit is very simple and it has a acceptable transmission. The signal transited from this fm transmitter circuit can be received at almost 300 meters in open air The circuit require a 3volts operating voltage and can be tuned anywhere in the FM band.

Low-Cost 3 volts FM Transmitter Circuit Diagram:

Low-Cost 3 volts FM Transmitter

You can use this rf transmitter circuit to transmit signal from your house to garden or from room to room . To listen the signal you can use any radio (portable or not ) that can work on FM band . The coil should be about 3mm in diameter and 5 turns. The wire is tinned copper wire, 0.61 mm in diameter.

After the coil in soldered into place spread the coils apart about 0.5 to 1mm so that they are not touching. If you don’t have a trim cap you can use a fixed value capacitor and you can vary the TX frequency by adjusting the spacing of the coils or placing a small piece of ferrite inside the coil, but the better way to change the transmission frequency is to use a variable capacitor.

Connect a half or quarter wavelength antenna (length of wire) to the aerial point. At an FM frequency of 100 MHz these lengths are 150 cm and 75 cm respectively. The calibration of this rf transmitter circuit is very simple and you need just to place a radio at some distance from the transmitter and set it somewhere about 89-90MHZ (chose the transmission frequency) and after that vary the transmitter oscillator frequency, by modifying the value of the capacitor. The transmission frequency is set to the desired frequency just when you can hear the transmitted signal.
Read More